Spring is creeping up here in Portland, time for spring cleaning and a little make over in the pantry.
Read More
--Melissa
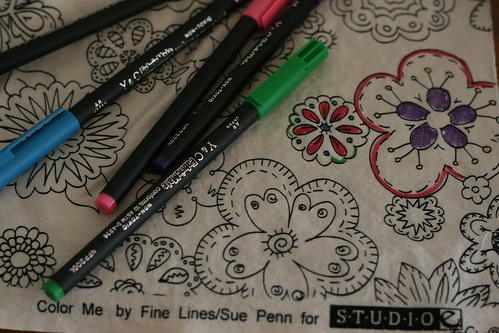
Studio E introduced a line of Color Me quilting weight cottons by Fine Lines/Sue Penn this year. They work in perfect combination with packs of textile markers from Fabric Mate (we carry two different color combo packs).These are non-toxic colorfast fine line marking pens made in Japan. I think kids (and adults) love the idea of drawing and coloring on fabric, especially during these warm days of summer. Of course, any sort of black on light prints would work for coloring in, or you could skip the lines and just play with muslin or solid color cottons.
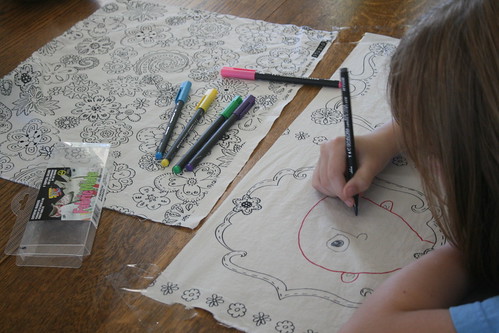
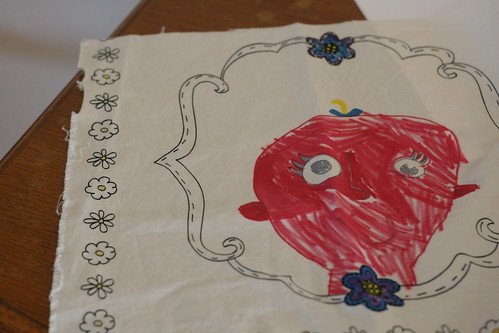
This is the sort of project that could save a whiny afternoon and make you a craft hero. But don't take my word for it! Our 9 year-old friend, Stella, was over and spent part of her afternoon trying them out.This girl is kind of a tough customer.
M: What do you think?
S: They are pretty good! They are definitely better than regular markers. The colors are bright.
M: Are they easy to draw with?
S: Yes. They are very easy to draw with. It takes a while to color big areas in though.
M: Well, it is a lot of pink.
S: Yes, it is a lot of pink.
Ideas for your finished masterpieces:
- Finish the edges for lunchbox napkins or sew into a simple drawstring bag for dance or soccer shoes.
- Sew into a twirly skirt or kerchief.
- Buy several yards and use as a table cloth for your next dinner or birthday party! Have markers out for your guests and you'll have s memorable and long lasting keepsake.
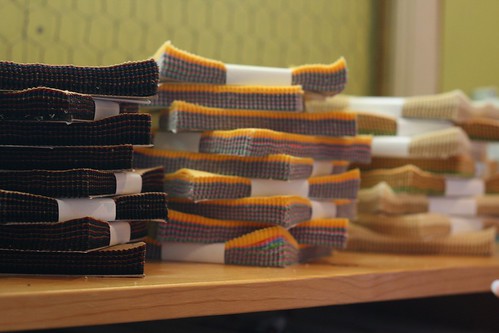
We're going to run a regular feature of super handy, sometimes overlooked or just plain quirky products that we carry at Bolt. First up is April's pick: Kona Solid Charm Packs!
Charm packs are (generally) 5" square packs of fabric perfect for quilting and small craft projects. Often fabric manufacturers will build entire patterns around charm packs and their cousins-- jelly rolls, layer cakes, fat 1/8s, etc. They make building half square triangles a snap and can be sliced and diced quickly for coin quilts, square patchwork, and any number of traditional blocks. They are economical and cute (two big advantages in my book).
But there's more! Try some of these out for size:
Kid art-- set your small people up with a stack of squares (use masking tape to fasten them to your table and to tape off a seam allowance) and a bunch of fabric pens. You can sew up their finished product into a wall hanging or pillow. They would also make fantastic tiles for an on-the-go version of Memory.
Bunting-- I love any kind of bunting or party flags. Leave them square, cut them into a triangle or rectangle and enclose the edges in a length of folded bias tape with fabric glue or your sewing machine.
Community Giving-- Pass them out to crafty friends before a shower or party and ask them to come up with a sewn block or mini embroidery. Assemble them before hand (or at the party!) and you will give a memorable and meaningful gift.
Do you buy charm packs? What is your favourite thing to use them for?

--Melissa
We stock all of our ribbon right up under the cutting table close to the register. Looking through those bins while your fabric is being cut, is a little like cruising the chocolate bars at the grocery store checkout: so tempting and so many to chose from! Thankfully, this an impulse buy that won't rot your teeth.

We just got a box of very reasonably priced grosgrain, perfect for ribbon belts and headbands (we've got your d-rings, too!).

These are some of my favourites. I love those folky flowers. They would look so sweet edging a chambray shirt or skirt. Ribbons are perfect for those of us who want to make our clothes unique without the time or know-how to sew our own.

There are dozens and dozens more to look through, including rick racks and pompom trims. We've also got a sale bin-- nice!

--Melissa
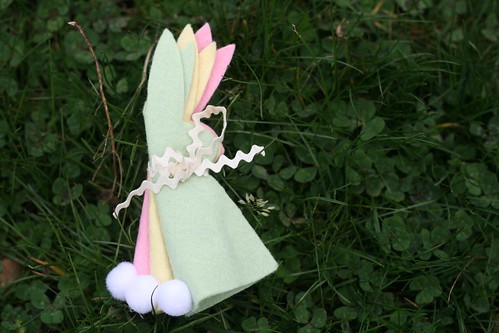
Amy put together these sweet, felt, finger puppets just in time to fill up Easter Baskets this weekend. And it's a no sew project! Instead of stitching, she glued the silhouette together using the wonder stuff, Liquid Stitch. If you are a glutton for a little more work, Purl Bee has a tutorial for similar bunnies put together with stitching and cute embroidery.

I am trying to dig out the three baskets I made for the boys last year. Here are two of them (I'm afraid the Super Special Place I put them is also going to remain a Super Secret). They are just Small Soft boxes, about 5" tall and wide, minus the heavyweight interfacing. I added short pieces of grosgrain ribbon for handles. They store flat or double as pretend grocery baskets for rainy day play.

--Melissa
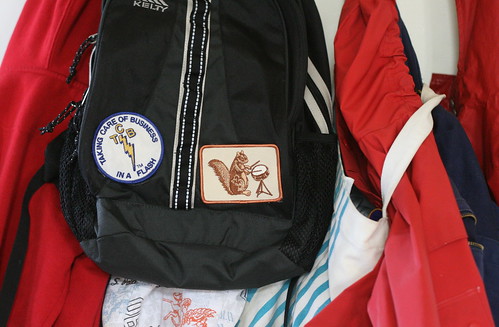
I am getting my six year-old ready for first grade (in truth, I am getting myself ready for first grade). He is ready and fully buying into the school-clothes-backpack-new-pencils preparation that is going on around us. Thankfully, he has not decided that he needs all new things and so we've set about making his old stuff better-- you know, more first grade.
Bolt stocks a nice supply of craft supplies for all your no-sew projects, and we are making good use of Liquid Stitch for all our backpack patch attaching needs. I have long looked for glue that will hold fabric to fabric-- this stuff seems like a good fit for small home dec repairs, shoe issues (I just reinforced some stitching by squirting some glue into a part of my canvas shoes), or patch attachment, when hand or machine sewing would be difficult. It goes on white and dries clear with a consistency a bit thicker than Elmer's. We used bull clips to clamp it in place while it dried (which takes a while and then longer to cure), and so far so good!
He insisted on attaching an Elvis' Taking Care of Business in a Flash patch that he found in a box. His Grandpa would be so proud. The squirrel playing drums is a Ferdinand product and one of my favourites. The glue is all mine-- I'm adding a bottle of it to my In Case of Craft Emergency bin.

By April (Bolt Employee and all-round great person).
Here's a cheap and easy way of making a little fabric go a long way. Here at Bolt, we regularly switch out the fabric we have on the wall by re-stretching new pieces. Do you have a piece of fabric you have been holding onto for years that you are too afraid to cut into? Or maybe your fabric is just a scrap that you saved from a project that gives you inspiration-- get it on the wall!


Supplies:
- Frames (varying sizes)-- If you are making your own frame you might want to have a right angle on hand to make sure that your frame is square before you put the fabric on it (at most any art supply store you can customize the size you want by buying different lengths for the four sides sides). This method can be useful if you are stretching a piece of fabric that may need a custom size frame. You might try the traditional art store "stretch a canvas" frame, or repurpose any wooden frame, just so long as it is able to withstand the depth of staples you choose. Sources for great frames in the neighborhood: Collage, Artery (Frame shop on Vancouver Ave.), SCRAP, or your favorite thrift store.
- Fabric-- If you choose to do series of wall hangings think about color and scale of your grouping. Get started with a favorite fabric, color, or theme and build off of that. I chose this piece for it's color and theme plus I needed something to show off my new bed spread (I just finished sewing it at Modern Domestic last weekend!).
- Staple gun and extra staples
- Hammer
- Optional: flat head screwdriver or pair of pliers for taking out misplaced staples
Iron your fabric( if you don't have an iron spray the fabric down with water and let it dry flat)! This is crucial, there is nothing worse than going through the process only to stare at a crease on your fabric on the wall as it is not easy to iron once it is on the frame. I use starch on my fabric to help it keep it's body.


Cut your fabric to size by giving yourself enough space to fold your fabric over at least once along each side. If your frame has a wider depth, make sure to compensate with extra fabric when measuring for that depth. The example here is a 1/2'' frame, I gave myself at least 2" on all sides.
The first four staples are the most important. You want to staple the center on all four sides first, alternating to opposing sides each time, pull the fabric between each staple but not so much that it will warp the design on your fabric.
Now the rest will fall into place. Start about 1.5'' from your center staple and lay in the next one. Rotate your frame to the opposite side and staple again, rotate staple, rotate staple. For every staple on the frame there should be one on the opposite side in roughly the same spot. The idea is to keep the fabric evenly stretched across the frame.


Once you have reached the corners make an effort to keep your
folded over fabric neat and taught, lay in a staple close to each
corner. You will be left with the wings of fabric that can be awkward to
deal with, so just fold your fabric over the corner and secure it a few
times on the back, it is OK if you are stapling over other staples.
You may want to decide which way the folds go according to the print on your fabric. If the fabric has a direction to it, choose the bottom and top for the fold over, or fold all the fabric over onto the sides. Feel free to trim the wings of fabric on the back once you are done stapling your corners.

Finally, take your hammer and hammer in all the staples that may
not of traveled deep enough in the wood. This last step will help the
frame hang flush with the wall.
You're done!


This may qualify as old news, but I love Amy Karol's Bend the Rules with Fabric. I have reached for it more than once this week, looking for projects that might keep my nearly six year-old busy while he pined away for school. Spring Break can be heartbreaking for a Kindergartener. It delivered for Mr. Antsy Pants and got me thinking about the projects I want to start after he's tucked in at night. I have my at home screen printing stuff on order.
These are no sew projects, BUT you could quite easily change that on the t-shirt by following her instructions for drawing with thread, or by putting your embroidery thread and running stitch to good use. I wanted to avoid tear away stabilizer for such a, uh, interpretive piece (Batman, cousins fight Batman, cousins fighting with Batman?! and some sleeve decoration). These are also *starter* projects; as in, they are works in progress perfect for messing around with in stages. I think I'm going to use the linen for making up some napkins and Sam already has another shirt going (this time with a bleach pen).

I asked him to draw a design on a hand-me-down t-shirt using a water soluble pen-- he's at that place in life where he will abandon work if he feels like he messed it up (I'm probably still at that place), so I wanted to give him an out if he needed to start over. After he was done drawing, I went over his design with a sharpie. We made sure to let it dry and then I let him have at it with the fabric paints. I used Jaquard Dye-na-Flo and Jaquard Textile Color (it's thicker and we carry it at Bolt) in combination for the linen and just the Dye-na-Flo for Sam's shirt.

Amy also details how to use resists when painting directly on fabric and how to get different effects using stamps and squeeze tubes (the linen and flowers). I love using the resist and I definitely want more practice with the paint. That's one of the reasons that I appreciate this book-- the techniques work and the projects are sweet, but more than that I just get to let go and see what happens.
We carry a stack of both Bend the Rules Sewing and Bend the Rules with Fabric.

by Melissa
I was leafing through this month's issue of Martha Stewart, where they were rehashing an old paper bloom project to make dogwood festooned branches. Papercrafting is lovely, but I've got fabric and son who is stoked to celebrate St. Patrick's Day this week (something about gold and pinching? I don't know.). Four Leaf Clovers it is.
What you'll need:
- Fabric scraps
- Fusible web-- something like Steam a Seam, Wonder Under, or what I used-- Heat'n Bond (it's nice and weighty)
- Clover template-- Fold a 3 or 4' square piece of paper into fourths and cut a way the corners into a heart shape. Unfold and flatten.
- Florist wire or pipe cleaner
- Scissors and an Iron

1. Fuse coordinating or contrasting fabrics together and trace clover shape onto one side.
2. Cut out
3. Fold cut shape into fourths and press with iron (this gives the flower some shape)
4. Make two holes near the center of your clovers using a large pin or awl
5. Thread one length of florists wire or pipe cleaner through each hole, twisting together on the other side to make a stem


You might try making your clovers different sizes, or twisting them together to add to a headband or as sweet corsage or broach. I'm going to try and wear one in a way that will avoid a certain 5 year-olds pinches on Wednesday.